Unlocking Cultural Artistry with the Tribal Mask 3D Layered SVG Cut File
Masks have been used for hundreds of years to represent a tribe's history, beliefs, and culture. They are more than just coverings; they are storytelling devices that bridge the gap between the spiritual and the physical. Today, modern crafters and small business owners have the unique opportunity to honor this tradition by creating their own tribal masks using digital design tools. The Tribal Mask 3D Layered SVG Cut File offers a beautifully designed pathway to bring these ancient aesthetics into contemporary home decor or product lines. Whether you are a seasoned vector artist or a beginner with a new cutting machine, understanding how to properly utilize these files is essential for achieving professional results.
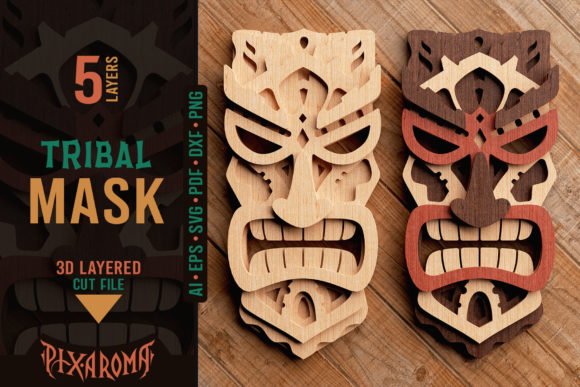
This specific design, often resembling a Tiki Head or Warrior Mask, is engineered for depth. Unlike flat decals, a 3D layered approach allows you to build dimension, shadow, and texture. The result is a piece that can serve as a striking centerpiece, sophisticated wall art, or a thoughtful gift for friends and family. However, diving into 3D layering without a clear strategy can lead to frustration, wasted materials, and a final product that lacks the intended impact. By approaching this project with foresight, you can avoid common pitfalls and create something truly exceptional.
Understanding the Complexity of Layered Designs
One of the most frequent misunderstandings among creators is underestimating the precision required for multi-layer projects. The Tribal Mask 3D Layered SVG Cut File typically includes five distinct layers. While this sounds manageable, each layer must align perfectly with the others to create the cohesive image of the warrior or tiki figure. A common mistake is rushing the weeding and assembly process. If even one layer is slightly misaligned during gluing, the shadows will look off, and the facial features may appear distorted.
To avoid this, take advantage of the file formats provided. You will receive Vector Files in AI, EPS, SVG, and PDF, along with DXF files for machines that prefer them. The "Stacked" versions are ready for immediate cutting if your software handles layering well, but the "Spread Layers" versions offer greater control. For beginners, it is often safer to cut the spread layers individually. This allows you to test fit the pieces on your material before committing to adhesive. Remember, this is a digital file download; no physical item is sent to you. The quality of your final physical mask depends entirely on your preparation and execution.
Selecting the Right Materials for Depth and Durability
The choice of material can make or break a 3D project. A significant error many hobbyists make is using materials that are too thick or too flimsy for a five-layer stack. If your cardboard or wood veneer is too thick, the mask becomes heavy and difficult to hang. If it is too thin, the layers may not provide enough shadow to define the 3D effect.
For the best results, consider using medium-weight cardstock for paper crafts or thin birch plywood for wooden signs. The included guide often suggests ideas for colors and materials, but real-world testing is key. If you plan to stain or paint the mask, ensure your material accepts finish well. A natural color finish highlights the grain of wood or the texture of paper, while staining adds an aged, authentic look that complements the tribal theme. Always cut a small test square of your chosen material to check how your machine handles the intricate details of the mask's eyes and mouth before cutting the full design.
Navigating File Types and Machine Compatibility
Another area where creators often stumble is file compatibility. Not all cutting machines read every file type with the same efficiency. While the package includes Raster JPG and PNG files for printing or reference, your cutting machine likely requires vector data. Users sometimes attempt to import the PNG directly into cutting software, expecting it to cut lines automatically. This leads to poor edge quality and lost detail.
Instead, always use the SVG or DXF files for cutting. These vector formats preserve the mathematical paths needed for clean cuts. If you are using a Cricut, the SVG is usually the smoothest option. For Silhouette users, the DXF might offer better compatibility depending on your software version. Before you begin, extract all files from the ZIP archive immediately after purchasing. Organize them into folders labeled "Vector," "Raster," and "Guides." This simple organizational step prevents the frustration of searching for the correct file mid-project and ensures you have the Quick Assembly Guide handy when you need it.
Maximizing Commercial Potential and Presentation
For entrepreneurs and small business owners, the ability to sell the physical project is a major draw. However, selling handmade goods requires a level of finish that exceeds hobbyist standards. A common oversight is neglecting the back of the mask. In a 3D layered project, the back can look messy with visible glue lines or uneven edges. To elevate your product, consider adding a backing layer of solid material that covers all internal mechanics. This not only improves durability but also gives the piece a polished, store-bought appearance.
Furthermore, think about the presentation. Since these masks make great gifts, packaging matters. A poorly packaged 3D mask can get crushed in transit, ruining the layered effect. When shipping or gifting, use rigid boxes rather than soft envelopes. Highlight the cultural inspiration in your product descriptions, explaining the significance of the warrior or tiki motifs. This adds value and connects with customers who appreciate meaningful decor. The included ideas for colors can inspire limited edition runs—perhaps a "forest spirit" version with green stains or a "sunset warrior" with warm red tones.
Assembly Techniques for Flawless Results
The assembly phase is where the magic happens, but it is also where patience is tested. Rushing through the gluing of the five layers is a recipe for disaster. Adhesive choice is critical; standard school glue can warp paper, while super glue can leave foggy residues on dark materials. Use a fine-tip applicator for precision and choose an adhesive that dries clear and fast.
A practical approach is to dry-fit all layers first. Stack them without glue to ensure the registration marks align and the depth looks correct. Once satisfied, work from the bottom layer up. Apply adhesive sparingly to the contact points rather than covering the entire surface, which can cause squishing and misalignment. Use a light weight, like a small book, to press the layers together while the glue sets, ensuring a flat and uniform bond. Refer to the Quick Assembly Guide included in your download for specific tips related to this design's geometry.
Creating with the Tribal Mask Tiki Head Warrior Mask - 3D Layered Cut File is a rewarding experience that blends technology with artistic expression. By paying attention to material selection, file management, and careful assembly, you avoid the common traps that lead to mediocre results. Whether you are decorating your own space or building a inventory for your shop, these digital tools empower you to create high-quality, culturally inspired art. Take your time, respect the intricacies of the design, and enjoy the process of bringing a timeless symbol to life in three dimensions.