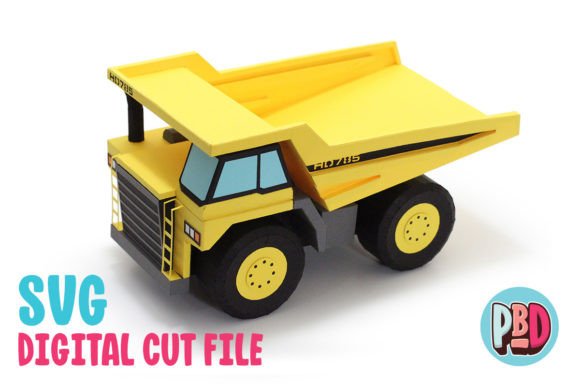
Building the Perfect Dump Truck 3D Papercraft: A Guide to Precision and Style
There is a distinct satisfaction in transforming a flat sheet of paper into a sturdy, three-dimensional object. The Dump Truck 3D Papercraft captures this magic perfectly, offering a design that is as functional for decor as it is enjoyable to assemble. Whether you are looking to add a touch of industrial charm to a child's bedroom shelf, create unique centerpieces for a construction-themed party, or simply enjoy a relaxing weekend project, this model delivers. When paired with complementary designs like the Excavator and Loader from Paper Beats Dynamite, it creates a cohesive collection that elevates any space. However, the difference between a wobbly, misaligned model and a pristine display piece often comes down to preparation and attention to detail.
Many enthusiasts jump straight into cutting and folding, assuming that digital files work universally without adjustment. This is rarely the case. To ensure your final build measures the intended 10.5 inches in length, 6 inches in width, and 6 inches in height with clean lines and perfect joints, you need to navigate the technical nuances of the download package. This guide will walk you through the common pitfalls users encounter with these specific files and how to avoid them, ensuring your effort results in a high-quality finish.
Choosing the Right Material for Structural Integrity
The most frequent oversight builders make involves material selection. The instructions for this design explicitly state that it is intended to be built using medium cardstock. Ignoring this recommendation can significantly compromise the structural integrity of your truck. If you opt for standard printer paper, the model will lack the rigidity needed to hold its boxy shape, leading to sagging sides and a bed that cannot mimic the dumping action effectively. Conversely, using heavy-duty cardboard or thick chipboard might seem like a way to make the truck more durable, but it often causes issues during assembly.
Thick materials resist tight folding, causing the corners to bulge or the glue tabs to pop open before the adhesive sets. Furthermore, intricate cut details may tear if the material is too dense for the blade depth you have selected. The "medium" specification is the sweet spot—it provides enough weight to stand alone on a shelf while remaining flexible enough for crisp creases. Before you start, check the GSM (grams per square meter) of your paper; typically, a range between 65lb and 80lb cover stock works best. If you are unsure, run a test fold on a scrap piece of your chosen material to see how it behaves under pressure.
Navigating File Formats: SVG vs. DXF
Once you have downloaded the ZIP file and extracted the contents, you will find both SVG and DXF cut files along with PDF instructions. A critical decision point arises here: which file format should you use? Many users default to DXF out of habit or software limitations, but for this project, the SVG cut file is vastly superior if your equipment supports it. SVG files retain vector data more cleanly, resulting in smoother curves and more precise corner cuts, which are essential for the wheel wells and the angular cab of the dump truck.
If you are using Silhouette Designer Edition (or higher) or Cricut Design Space, prioritize the SVG file. Users who force the DXF file into these advanced programs often report that the files open slowly and produce "noisy" cut lines. This noise manifests as tiny, unnecessary micro-cuts along straight edges, which can weaken the paper and make weeding (removing excess material) a tedious nightmare. The DXF format is primarily included for those restricted to Silhouette Basic Edition, which cannot read SVGs. If you must use DXF, be prepared for a longer processing time and potentially less refined edges.
Correcting Silhouette Studio Preferences
For those who must use the DXF file in Silhouette Studio, there is a specific configuration step that is often overlooked, leading to files that load incorrectly or appear off-center on the virtual mat. By default, Silhouette Studio may attempt to import DXF files "As-is," which can cause scaling errors or positioning issues that throw off the final dimensions of your truck. To prevent this, you need to adjust your software preferences before opening the file.
Follow these steps to ensure proper loading:
- Navigate to Edit and select Preferences.
- Click on the Import tab within the preferences window.
- Locate the DXF section and change the setting from "As-is" to "Centered".
Making this simple change ensures that the design loads directly into the center of your workspace, maintaining the correct scale and orientation. Skipping this step often results in users inadvertently resizing the image to fit the mat, which ruins the intended 10.5 x 6 x 6 inch proportions. If the truck ends up too small, the internal tabs may become too fiddly to glue; if it is too large, the cardstock may not support the span of the truck bed.
Assembly Strategies for a Professional Finish
Even with perfect cuts and the right paper, the assembly phase holds its own challenges. A common mistake is applying liquid glue too liberally. While white craft glue is excellent for paper, excessive moisture can warp medium cardstock, causing the panels of the dump truck to bow outward as they dry. Instead, use a fine-tip applicator or a toothpick to apply a thin, even layer only to the tabs. For faster results and less warping, consider using a high-quality glue stick or double-sided tape designed for scrapbooking, provided it has enough tack to hold the weight of the assembled sections.
Another area where builders struggle is the scoring process. While some machines can score automatically, doing it manually with a dull tool or the back of a butter knife often yields inconsistent folds. Invest in a dedicated scoring tool or an embossing stylus. Score lightly along the fold lines before attempting to bend the paper. This breaks the fibers just enough to allow a sharp 90-degree turn without cracking the surface color of the cardstock. Pay special attention to the hinge mechanism of the dump bed; if these folds are not crisp, the bed will not tilt smoothly, defeating the purpose of the design.
Maximizing the Value of Your Download
When evaluating whether to purchase or download a papercraft kit, look beyond the preview images. The inclusion of a full material list in the PDF instructions is a sign of a well-thought-out design. It saves you from guessing and wasting expensive cardstock on trial runs. Additionally, the versatility of this design allows for creative customization. Since you are painting or coloring the paper before assembly (if desired), you can match the truck to specific event themes or room decor palettes. Imagine a fleet of trucks in varying shades of yellow, orange, and safety green displayed together on a mantel.
Remember that the ZIP file contains everything you need, but only if you extract it properly. Trying to open the SVG or DXF directly from the compressed folder without extracting it first can lead to error messages in your cutting software. Take the extra minute to unzip the folder to your desktop or a dedicated project directory. This ensures that all linked assets load correctly and that you have easy access to the PDF instructions while you build.
By respecting the material requirements, choosing the correct file format, and taking care during the scoring and gluing phases, you transform a simple digital download into a tangible, high-quality piece of art. The Dump Truck 3D Papercraft is designed to be robust and visually appealing, but it relies on the builder's precision to reach its full potential. Avoid the rush, double-check your settings, and enjoy the process of bringing this miniature heavy-hauler to life.